Camera settings And modes
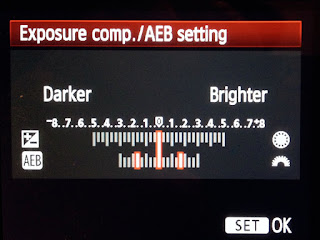
EXPOSURE BRACKETING
Bracketing
is a simple camera function option that allows the photographer to take 3 or
more photos of
the same
subject, changing the exposure by a user-set amount with each photo so that the photographer
can later
choose which exposure worked best and rendered the best photo. This is a good
tool for
beginners to
use while they learn the subtle tweaks that make for better exposure. It is
also useful when
taking
photos to that will later be post-processed using HDR software.
As an
example, if you’re photographing a sunset, you know you want
negative exposure compensation,
but how
much? You might bracket three photos at -1.0 -2.0 & -3.0 and then choose
which looks best.
SHOOTING MODES
Most
consumer-level DSLR cameras offer a wide variety of shooting modes
to give the photographer
fully
manual, semi-manual, or fully automated control of exposure.
Auto – the default point-n-shoot mode for any camera. Use this until you become
comfortable
with
exposure fine-tuning. And use it when loaning the camera to someone
else who doesn’t
understand
cameras
“Dummy”
modes – these are usually marked cutesy little icons to represent
“action” mode, or
“portrait”
mode, or “landscape” mode, etc. These are a very minor step up in control over
Auto
these modes
operate fully automatic with no further manual input from the photographer.
P, S, A, M
modes (on Nikon and others) P, Tv, Av, M (on Canon) – these are the manual and
semi-manual modes that most professional photographers use to ensure control
over exposure
P – Program Auto Exposure – similar to Auto in that
camera sets both aperture and
shutter
speed, but allows the photographer to dial in exposure compensation, and does
NOT
automatically engage and use on-camera flash
(photographer must make conscious
decision to
use flash).
A or Av –
Aperture-priority Auto Exposure – Photographer sets desired aperture; camera
sets
corresponding “correct” shutter speed. Otherwise operates similar to Program
AE.
S or Tv – Shutter-priority Auto Exposure – Photographer sets
desired shutter speed;
camera sets
corresponding “correct” shutter speed. Otherwise similar to Program AE
.
M – Manual
exposure – Photographer selects both aperture and shutter speed and
camera
“suggests”
whether these values will render accurate exposure, like older pre-AE cameras.
This mode is
invaluable for difficult lighting situations when photographer wants to lock
in
particular settings he/she knows will render the exposure he wants, regardless
of
camera “suggestion”.
WHITE BALANCE
This is the
other element of digital photography, along with ISO, that sets it apart from
35mm film
photography.
With a digital camera, adjustments for white balance or
color balance can be made within
the camera
itself. With film, either the actual film itself was changed (different films
were manufactured
to be used with different types of lighting) or color correcting filters
were placed in front of the lens.
The term
white balance started with television and video production and refers to equalizing
or
balancing
the color cast from different lighting sources
to achieve a desired neutral color effect (a
necessity with the advent of color TV). This ensures that white objects appear white
(not blueish or
yellowish)
and that colors appear true and neutral (not influenced by the color of the
light itself).
Different
lighting sources emit different colors of light. The human eye adjusts automatically for these
differences,
but the camera sensor or film does not (or at least
not as well as the human eye). We don’t
often notice
the difference, but …
Different
variations of fluorescent bulbs emit greenish, bluish or pinkish light.
Compact
fluorescent (CFL) light bulbs (those new curly cue lights) differ depending on
brand,
but often
are color balanced to give off light similar to incandescent.
The sun
emits different colors of light depending on the time of day and its position
relevant to
the earth.
At high
noon, the sun’s light is an almost pure white.
But closer
to sunrise and sunset, the sun can emit starkly orange-tinted light.
When
obscured by objects, shaded sunlight gives a distinct bluish tint.
Photographic
flash emits a pure white light similar to mid-day sun
Special tungsten-light photographic strobes used in studios emit an orange-cast light
requiring
specific
manual white balance settings.
Scientifically
these differences are measured with the Kelvin scale of light “temperature”. Some
photographers
must know and adjust for exact Kelvin measurements (for example, fashion
photographers
and catalog photographers who must render the color of clothing and other
merchandise
exactly as it appears in real life), and many professional
and semi-professional DSLR cameras can set
white
balance to any specific Kelvin temperature. Measuring the exact Kelvin
temperature, however,
requires
very expensive color temperature light meters ($500 or more).
But most of
us can get by adjusting for just the basic lighting categories
discussed above. And nearly all
modern
digital cameras include basic white balance adjustments.
White balance modes
Auto (or
AWB) – this all-purpose mode, in which the camera makes a rudimentary attempt to
measure light
temperature and adjust accordingly, works very well in scenes lit by camera flash
or sunlight.
It is also a decent setting for scenes with
multiple different light sources (i.e. inside a
home with
incandescent light bulbs, open windows letting in diffused sunlight, and on-camera
or
fluorescent.
Source-specific – these modes vary by camera but are usually self-explanatory and include some
or all of
the following. On many cameras, the modes below can also be fine-tuned by variables
plus or
minus 3 to signify the intensity of the effect of the color correction. Using
this fine tuning
typically
involves trial and error. So if you shoot in a specific setting often, make
note of which
mode and
fine-tune setting works best so you can use it each time.
Fluorescent
Flash
Bright
sunlight
Cloudy
Shade
Preset (PRE)
– this is one of the best, but most under-utilized and least understood white balance
where the
correct mode above cannot be determined or where a mixture of various lighting
sources
cannot be properly balanced using the Auto mode. In a nutshell, you activate
this mode
(follow
camera-specific instructions in user manual), take a test shot
by photographing a solid
white
subject that completely fills the camera viewfinder, and the camera does the
rest by
shifting the
white balance to ensure that white objects photographed under the current
lighting
will show up
as white in the photograph until the photographer changes white balance mode
again. As
for a solid white object, you can simply locate a person wearing a white shirt,
but
keeping one
of the following items in your camera bag can be helpful when presetting white
balance:
White paper
or card – any flat solid white object (even a white text-free page of your
camera user
manual)
Wax paper or a Pringles can lid – place either translucent white item directly over the
front of
your lens and take the preset test shot while pointing the camera toward the
light
source or
the subject
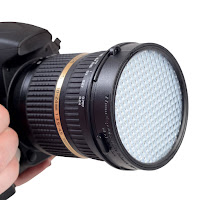
Expodisc – similar in use to the translucent items above, this is a
photographic-quality
glass filter
that provides extremely reliable results with preset white balancing. This is a highly
recommended
item for professional or semi-professional
photographers who want to
obtain the
most accurate possible white balance without using a Kelvin meter.
Creative use of white balance
While the
above information has focused on obtaining proper neutral white balance, these
same tools
can be used
for creative photographic effects. With film cameras, creative photographers
have used
colored
filters or “incorrect” film or developing to purposely produce strange and
creative lighting
 effects. Intentional “misuse” of white balance controls can render similar results. For example, set the
camera’s
white balance to fluorescent while taking photos under normal household
incandescent lighting
and the resulting photo will
have a heavy orangeish tint.


Comments